kair.us/ projects/ il_button_leds/

IL arcade buttons LED modification

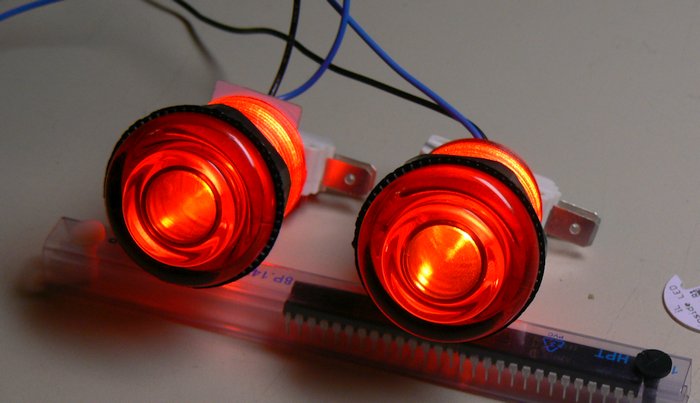
Illuminated red concave
      translucent IL arcade buttons

I am a fan of the IL (Industrias Lorenzo, S.A.) arcade buttons and joysticks. Especially the convex old style arcade buttons. They are available in different colors, both translucent and opaque. But without illumination. Not anymore!

I have designed two different style PCBs to address the issue. One goes inside the button, the other is mounted on bottom of the button and is held in place by the microswitch. On the image above, the left button has the 'outside' version and the right one has the 'inside' version. There isn't much difference in appearance between the two. The outside version gives a bit deeper color as there is more colored plastic to pass through (if you use white LED).

The board

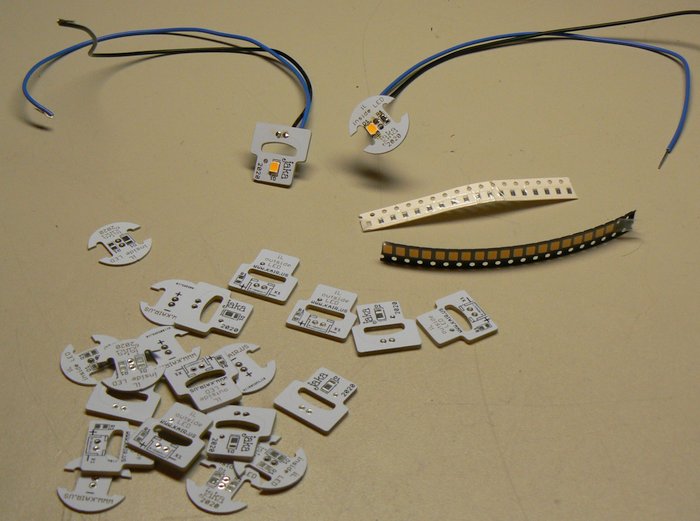
LED illumination boards for IL
      arcade buttons

The above picture shows the boards and required components. Just one LED and one resistor per board. You can download the Eagle design files below. I have manufactured the boards at PCBWay and shared the design. You can order boards from PCBWay from these links: IL inside LED and IL outside LED.

il_inside_led.zip
il_outside_led.zip

Table below shows suggested bill of materials. However, the LED could be pretty much any other 2835 case LED, and you could use a colored LED to match the button color. The given Cree part number probably won't be in production for many years, as the LEDs are constantly evolving. In such case, just search for a white Cree J-series LED in 2835 package. The suggested 100 ohm resistor gives ca. 20 mA current, but you may need to adjust it to match your taste.

Description
Qty
Parts
Digi-Key part number
Mouser part number
R THICKFILM 100Ω 0805
1
R1
311-100CRCT-ND
603-RC0805FR-07100RL
LED JE2835 SERIES CREE
1
D1
JE2835AWT-00-0000-000A0UF940ECT-ND 941-JE2835W00A0UF940

How to install it

The outside LED board is very easy to install. Just put it between the button body and the microswitch. You can add a small adhesive rubber feet to stop the board moving around, as shown in picture below.

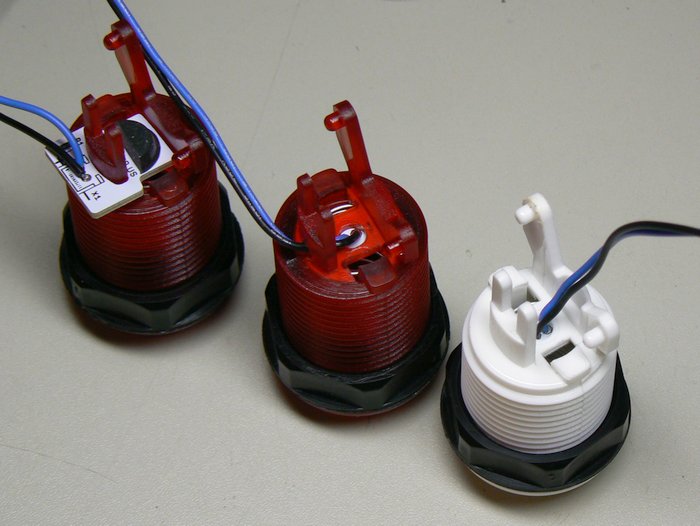
The inside LED board requires more work. The amount of work also depends on the button type. On some IL buttons there is already a hole in the middle, through which the wires can pass. They also have small recessed area on the micro switch holder arm, which again allows wires to pass through it. But on some IL buttons both these features are missing, and you need to drill two holes for the wires, as shown on the middle button on image below. I am not 100% sure how to determine which IL button models have the hole and recess. But it seems that all my short stem buttons (PSL) and none of my long stem buttons (PSL-L or PSL-L/CV) have them.

Illuminated IL arcade buttons, how to install the LED
      board

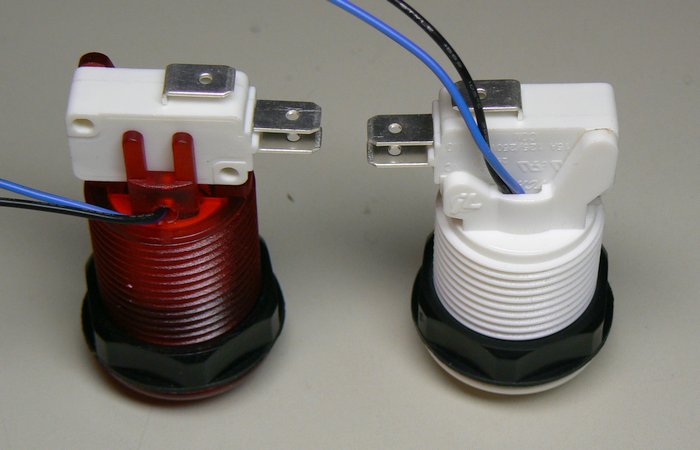
Here is another picture displaying the difference. On the left we have IL PSL-L; concave, translucent red button with long stem. You need to drill two holes ton install the IL inside LED board. On the right we have IL PSL-H; concave white arcade button with short stem. You don't need to drill anything. Just disassemble the plunger, place the board under the spring and run wires through the hole. When attaching the microswitch, the wires can pass it through the recess.

Wiring the LED
      illumination for IL inside LED board on long stem and short stem
      arcade buttons

Results

Photo below shows six different color translucent buttons with white Cree LED. The LED current is 20 mA here (R1 = 100 ohm), but you probably want to use lower current. The light is very bright when looking straight to button. You could go even down to 2 mA (1 kohm resistor) and it is still bright. There is some difference in brightness between the colors. The clear and yellow are the brightest. Green is the dimmest. All the buttons here use the IL outside LED board.

Color comparison of IL translucent arcade
      buttons with LED illumination

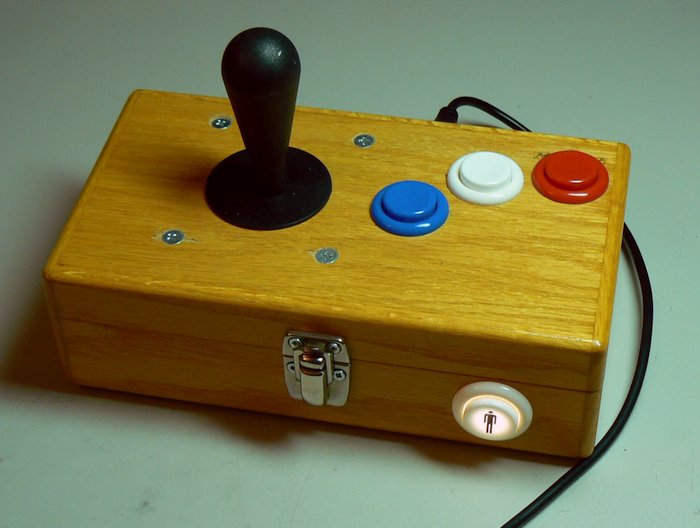
The Cree LED is so bright that you can even illuminate an opaque white button! It actually looks very nice, because the light is diffused more compared to translucent buttons. Photo below shows one of my arcade sticks, where I have illuminated the start button. I am using here the IL inside LED board, with higher, 40 mA current (R1 = 50 ohm), and the result is perfect. By the way, the arcade stick uses the J-ACE arcade controls encoder, which can also control LEDs. Check it out!

Arcade stick with IL
      Eurostyle joystick and IL PSL-H buttons. J-ACE arcade controls
      encoder and illuminated start button.

Colored LEDs

You could also use colored LEDs to get slightly deeper color. I have tested Refond branded color LEDs which have compatible 2835 footprint, even though datasheet claims PLCC-2. Note that the polarity of the LEDs varies with color! Green and blue LEDs have same polarity as Cree, while red and yellow have reverse polarity for some strange reason. In this project is is not a problem, as you can of course reverse the wiring to the board.

This isn't the first time that I see something funny with LED polarity. Some years ago we needed yellow led lights for one project. We got samples from Taiwanese manufacturer and lighting performance was good. We then bought a reel of these LEDs and had them assembled on boards. The boards didn't work, and we eventually found out that the polarity was reverse compared to samples and the datasheet. We of course contacted the distributor. We didn't receive any compensation, just a new datasheet which shows the 'new' correct polarity! As the LEDs were side-shooter SMD type, it wasn't possible to just rework them 180 degrees. We needed a new batch of boards.

Well, back on topic. The table below shows Refond codes and provides also product links to TME. There's also white Cree LED for comparison. Treat the flux readings as indicative only, they are estimated from the typical values and relative luminosity graphs on the datasheets. The light performance of the LEDs is quite well suitable for IL button illumination. The yellow LED is more like amber. It is well suited for orange button. It works also with yellow button, but it appears slightly orange when lit up. The colored LEDs are particularly useful if you want to illuminate the translucent clear buttons with a certain color.

Color
Part number
Wavelength (typ)
Luminous flux @20mA
Vf (typ @20mA)
Red
RF-OURI35TS-CH-N
621 nm
3.5 lm
2.0 V
Green
RF-GNRI35TS-CK-N
520 nm
9.2 lm
2.7 V
Blue
RF-BNRI35TS-CK-N
469 nm
2.1 lm
2.9 V
Yellow
RF-YURI35TS-AF-N
592 nm
2.6 lm
2.1 V
White
Cree JE2835 series CRI90
4000 K
9.6 lm
2.6 V

Photo below shows red, orange, yellow, green and blue concave buttons with Refond LED on IL outside LED board. The orange and yellow button both appear almost same color when lit up. The green button, which has darkest plastic, lits up nicely with the Refond LED. All boards here use 100 ohm resistor and they are driven from the same 5 V source. The blue button is surprisingly bright compared to claimed lumens.

Industrias Lorenzo PSL-L concave arcade
      buttons with color 5V LED illumination

kair.us/ projects/ il_button_leds/

page created 29.10.2020
last updated 6.12.2020 webmaster@kair.us