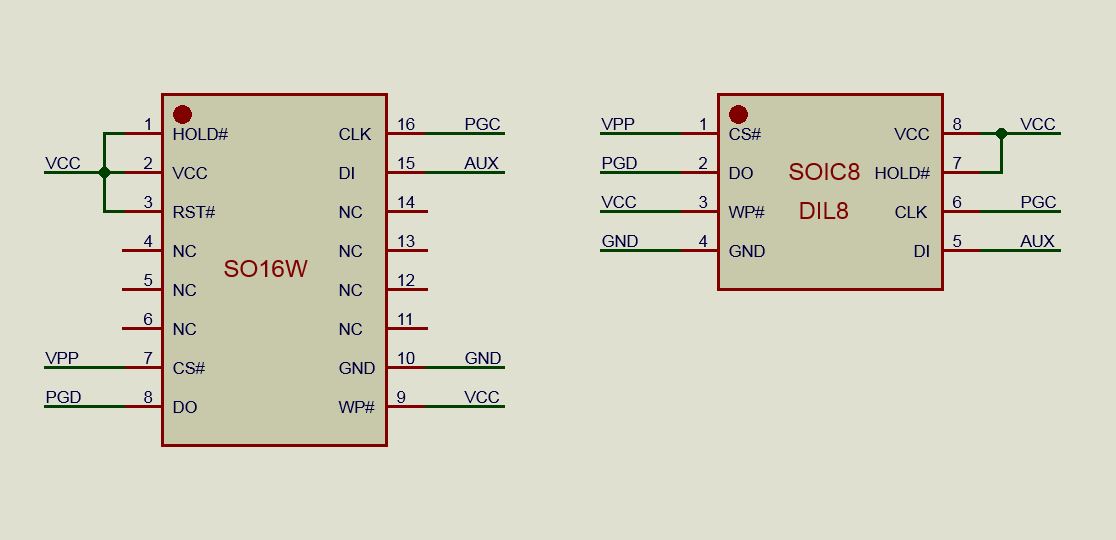
Besides different EEPROMs, now you can read and write SPI FLASH devices with PICkit2 and PICkit3. Support is added to PICkitminus, starting from version 3.21.00 GUI software and 1.24.00 command line software (pk2cmd).
The connection is similar as for SPI EEPROM chips. See below
diagram for connection advice for typical chips. Note that on
PICkit3 the AUX pin is called PGM or LVP. Diagram made by Adem
Gdk.
Starting from 3.26.04 GUI software and 1.26.06 pk2cmd versions,
1.8 V FLASH chips are also supported. Please note that PICkit2
with it's simple voltage clamp circuit is not guaranteed to work
according to PIC18F2550 input level specifications, but all my
genuine PICkit2 programmers have worked without problems even down
to 1.7 V. YMMV. The PICkit3 has proper level translation circuits,
so it should always work.
Even though the SPIFLASH 1v8 family is searched first, and
SPIFLASH family second, I strongly recommend to use manual
device select mode for all FLASH chips. If the FLASH chip is
not properly recognized, the auto search will eventually continue
to PIC families and apply +12V to CS# pin. Be careful and don't
burn your FLASH!
Another note; it is good to keep the wires between PICkit and
FLASH chip short. The DO / SO pin has quite low drive strength on
some FLASH devices. The clock can cause crosstalk, giving read and
verify errors. It might help a little if you disable fast
programming.
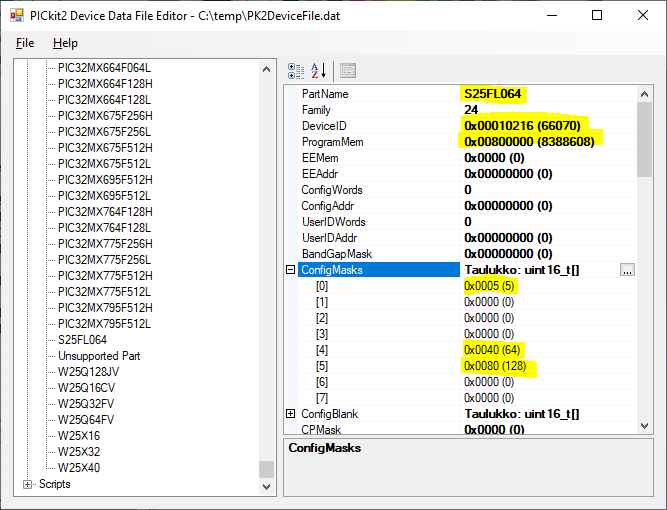
There are already some chip types added to SPIFLASH family. More
can be added with device
file editor by dougy83. When you add devices, pay attention
to these parameters:
Also ConfigRdScript has special purpose for SPI FLASH chips. It
is used to read STATUS register. This is used to check whether
chip is busy performing an erase. It is also used to check if the
last write has finished. Otherwise the busy bit is read in the
write script, before starting new write operation. Note that you
don't normally need to touch these scripts, this is just FYI.
Usually copying an existing SPI FLASH device and modifying the
above listed parameters is enough.

kair.us/ projects/ pickitminus/ program spi flash devices with pickit2 and pickit3
page created 27.6.2023
last updated 8.5.2025 webmaster@kair.us